To delete blank rows in Excel, you can select them by pressing CTRL + G, choosing “Blanks” in the “Go to Special” dialog, then highlighting them and clicking “Delete Sheet Rows” under the “Cells” section on the Home Tab. This process effectively removes all the empty rows from your Excel sheet.
Introduction
Microsoft Excel, the powerhouse spreadsheet software, has revolutionized the way we manage data. Whether you’re a data analyst, a finance guru, or just someone tracking their monthly expenses, Excel is a trusted companion. But as you work with larger datasets, you may encounter a common nuisance – blank rows. These empty spaces can clutter your sheet, making it harder to read and analyze. In this guide, we’ll walk you through the process of deleting those pesky blank rows in Excel, making your data cleaner and your life easier.
Why Do Blank Rows Appear?
Before we delve into the deletion process, let’s understand why blank rows appear in your Excel sheet:
- Manual Entry: Sometimes, during data entry, we inadvertently press the Enter key, creating empty rows.
- Data Import: Imported data may contain empty rows, especially if the source file has irregular formatting.
- Filtered Data: Applying filters can hide non-contiguous rows, leaving only the blank ones visible.
If you have a data set or some sort of records in excel sheet and there are some empty rows in it, it could become pain in the ass to remove each row at a time and if you a larger number of data it could take several days. So, I am going to tell you the right and the shortcut way of doing it.
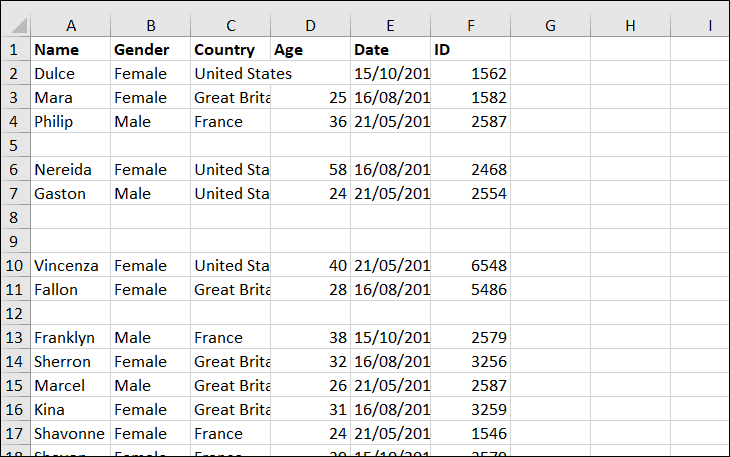
Suppose we have data set like this:

Steps To Delete Blank Row In Excel:
- Select the empty row and press CTRL + G
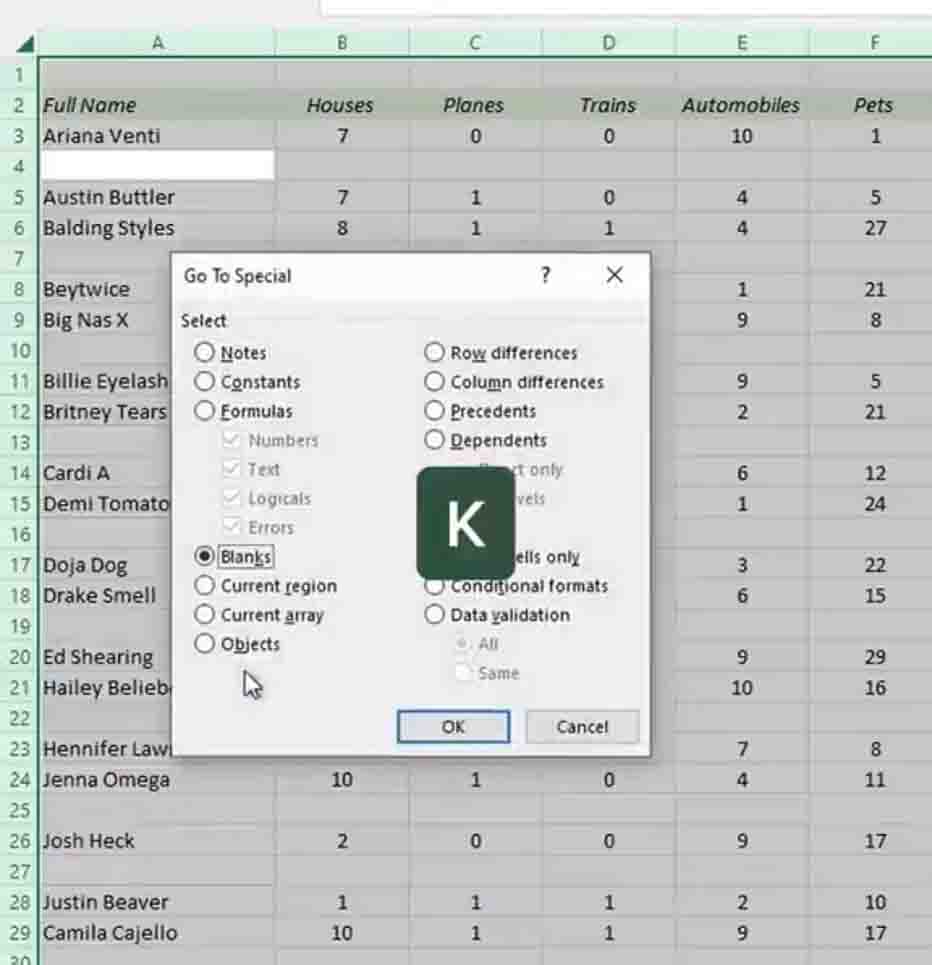
- Click to Go to Special
- Choose Blanks
- Click OK and then all the blank rows/cells will be highlighted
- Choose the Delete under Cells section on the Home Tab
- Click Delete Sheet Rows

The Consequences of Ignoring Blank Rows
Leaving blank rows unaddressed can lead to various issues:
- Reduced Readability: Navigating through a cluttered spreadsheet can be frustrating and time-consuming.
- Data Misinterpretation: Blank rows may distort data, leading to incorrect calculations and analysis.
- Increased File Size: Unused blank rows contribute to larger file sizes, which can affect performance.
Alternative Ways to Delete Blank Rows in Excel:
Now, let’s get to the heart of the matter – how to delete blank rows in Excel.
Manual Deletion
- Select the Rows: Click and drag to select the rows you want to delete.
- Right-Click: Right-click on the selected rows.
- Delete: From the context menu, choose “Delete.” A dialog box will appear.
- Shift Cells Up: In the dialog box, select “Shift cells up” to close the gap left by the deleted rows.
- OK: Click “OK,” and the blank rows will vanish.
Using Excel Functions
For more extensive datasets, manual deletion can be tedious. Excel provides several functions to automate this process.
- Go to ‘Home’: First, make sure you’re on the ‘Home’ tab.
- Find and Select: In the ‘Editing’ group, click on ‘Find & Select.’
- Go to ‘Go To Special’: Select ‘Go To Special.’ A dialog box will appear.
- Choose Blanks: In the dialog box, choose ‘Blanks’ and click ‘OK.’ All blank cells will now be selected.
- Delete: Right-click on any selected cell, choose ‘Delete,’ and select ‘Shift cells up.’ Click ‘OK,’ and voilà, blank rows are gone!
Using Filters
If your data has filters applied, you can use this method:
- Apply a Filter: Click on the filter icon in the column header.
- Filter for Blanks: In the dropdown, uncheck ‘Select All,’ and only select ‘Blanks.’ Excel will now display only blank rows.
- Select All Visible Rows: Click and drag to select all the visible rows.
- Delete Rows: Right-click on any selected row, choose ‘Delete,’ and select ‘Shift cells up.’ Hit ‘OK’ to delete the blank rows.
Frequently Asked Questions (FAQs)
Q1: Will deleting blank rows affect my data?
A1: No, deleting blank rows will not affect your data as long as you’re certain those rows don’t contain any vital information. Always double-check your data before deletion.
Q2: Can I delete multiple blank rows at once?
A2: Yes, you can delete multiple blank rows simultaneously by selecting them all before deletion.
Q3: Is there a way to prevent blank rows during data entry?
A3: To prevent accidental blank rows, use data validation rules or Excel tables, which automatically expand as you enter data.
Q4: Can I undo the deletion of blank rows?
A4: Yes, you can use Excel’s ‘Undo’ feature (Ctrl + Z) immediately after deleting rows to reverse the action.
Conclusion
Blank rows in Excel needn’t be a source of frustration. With the simple techniques outlined in this guide, you can effortlessly declutter your spreadsheets, making data analysis and presentation a breeze. Remember to exercise caution when deleting rows and always keep backups of your valuable data. Happy Excel-ing!

