
In the following article, you will learn about different methods of authentication and authorization in node.js. How authentication and authorization is performed in node.js with coding example of each type.
Welcome to the world of Authentication and Authorization in Node.js! In this article, we’re going to dive into the realm of user identity verification and access control. By the time you finish reading, you’ll have a clear understanding of authentication and the three popular methods used in Node.js: Session-based, Token-based, and Passwordless authentication.
If you want to use Node.js and learn about their different frameworks follow the link, click here.
Table of Contents
- Introduction
- Understanding Authentication
- Implementing Authentication in Node.js
- Three Types of Authentication Methods
- Comparing and Contrasting
- Implementing Authentication in Node.js
- Best Practices for Authentication and Authorization
- Enhancing Security with Middleware
- OAuth2 for External Authentication
- Securing APIs with JWT
- Common Authentication Vulnerabilities
- Protecting Against Attacks
- Conclusion
- Frequently Asked Questions
1. Introduction
In the ever-evolving world of web development, security is paramount. When creating web applications using Node.js, understanding and implementing authentication and authorization are crucial steps. This article will guide you through the concepts of authentication and authorization in Node.js, provide practical code examples, and offer best practices to ensure your application is secure.
2. Understanding Authentication
To better understand, authentication is the process of verifying the identity of a user, ensuring they are who they claim to be. It typically involves credentials like usernames and passwords. In Node.js, popular libraries like Passport.js make implementing authentication seamless.
3. Defining Authentication
Authentication is like the bouncer at a VIP club, ensuring that only the invited guests get in. In the digital world, it’s the process of confirming a user’s identity by checking their credentials – like a username and password – to make sure they are who they claim to be. This is crucial for keeping your online world secure.
4. Three Types of Authentication Methods in Node.js:
Node.js offers three main ways to achieve this. Each method has its unique characteristics and use cases.
4.1: Session-based Authentication:
Think of Session-based authentication as getting a stamp on your hand when you enter an amusement park. Here’s how it works:
- You provide your login credentials.
- The system checks them against its database.
- If valid, a unique session ID is created and stored in both the server and your browser as a cookie.
- When you leave or log out, the session ID is wiped from both sides.
It’s like a temporary pass that allows you access until you leave.
const express = require('express');
const session = require('express-session');

const app = express();

app.use(session({
  secret: 'your_secret_key',
  resave: false,
  saveUninitialized: true,
}));

app.get('/login', (req, res) => {
  // Check user credentials from a database
  const isValidUser = checkCredentials(req.body.username, req.body.password);

  if (isValidUser) {
    req.session.authenticated = true;
    res.send('You are now logged in!');
  } else {
    res.send('Invalid credentials. Please try again.');
  }
});

app.get('/secure', (req, res) => {
  if (req.session.authenticated) {
    // Access the secure resource
    res.send('Welcome to the secure area!');
  } else {
    res.send('You are not authenticated. Please log in.');
  }
});

app.listen(3000, () => {
  console.log('Server started on port 3000');
});
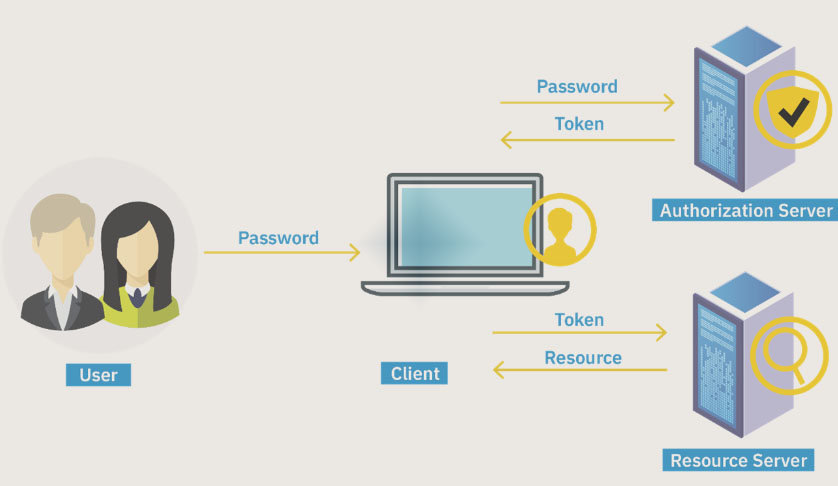
4.2: Token-based Authentication and Authorization in Node.js:
Token-based authentication is like having a golden ticket that vouches for you. This method splits into two parts: authentication and authorization.
Token-based Authentication:
- Your browser contacts an authentication server and receives an ID token.
- The ID token is stored as an encrypted cookie on your device.
- It’s used as proof of your authentication when you access a web application.
Token-based Authorization:
- When you want to access a protected resource (like an API), your browser sends an access token with your request.
- The token contains info about your permissions but is secure because it’s encrypted.
- Even if it’s stolen, your credentials remain safe.
Code Implementation:
const express = require('express');
const jwt = require('jsonwebtoken');

const app = express();

const secretKey = 'your_secret_key';

app.post('/login', (req, res) => {
  // Check user credentials from a database
  const isValidUser = checkCredentials(req.body.username, req.body.password);

  if (isValidUser) {
    const payload = { username: req.body.username };
    const token = jwt.sign(payload, secretKey, { expiresIn: '1h' });
    res.json({ token });
  } else {
    res.status(401).json({ message: 'Invalid credentials. Please try again.' });
  }
});

app.get('/secure', verifyToken, (req, res) => {
  // If the token is valid, access the secure resource
  res.send('Welcome to the secure area!');
});

function verifyToken(req, res, next) {
  const token = req.headers['authorization'];

  if (!token) {
    return res.status(403).json({ message: 'Token not provided.' });
  }

  jwt.verify(token, secretKey, (err, decoded) => {
    if (err) {
      return res.status(401).json({ message: 'Invalid token.' });
    }
    req.decoded = decoded;
    next();
  });
}

app.listen(3000, () => {
  console.log('Server started on port 3000');
});
4.3: Passwordless Authentication in Node.js:
Imagine you have a magical key that opens doors without a lock. Passwordless authentication is all about proving your identity without traditional login credentials. Here’s how it works:
- Your device generates a pair of keys – public and private.
- The public key is known to the application, but only you have the private one.
- When you sign in, a challenge (like biometrics or a magic link) is encrypted with your public key.
- You decrypt it with your private key, and voila, you’re in!
Code Implementation:
const express = require('express');
const crypto = require('crypto');

const app = express();

// Simulated database of public keys for registered users
const publicKeyDatabase = {};

app.post('/register', (req, res) => {
  const username = req.body.username;
  // Generate a pair of public and private keys for the user
  const { publicKey, privateKey } = crypto.generateKeyPairSync('rsa', {
    modulusLength: 2048,
    publicKeyEncoding: {
      type: 'spki',
      format: 'pem',
    },
    privateKeyEncoding: {
      type: 'pkcs8',
      format: 'pem',
    },
  });
  // Store the public key in the database
  publicKeyDatabase[username] = publicKey;
  res.send('Registration successful!');
});

app.post('/login', (req, res) => {
  const username = req.body.username;
  // Generate a challenge (e.g., one-time passcode)
  const challenge = generateChallenge();
  // Retrieve the user's public key from the database
  const publicKey = publicKeyDatabase[username];
  if (!publicKey) {
    return res.status(404).send('User not found.');
  }
  // Encrypt the challenge with the user's public key
  const encryptedChallenge = crypto.publicEncrypt(publicKey, Buffer.from(challenge));
  res.send({ encryptedChallenge });
});

app.post('/verify', (req, res) => {
  const username = req.body.username;
  const response = req.body.response;
  const privateKey = // Retrieve the user's private key from a secure location
  // Decrypt the response using the user's private key
  const decryptedResponse = crypto.privateDecrypt(privateKey, Buffer.from(response));
  const expectedChallenge = // Retrieve the expected challenge for this user
  if (decryptedResponse.toString() === expectedChallenge) {
    res.send('Authentication successful!');
  } else {
    res.status(401).send('Authentication failed.');
  }
});

function generateChallenge() {
  // Generate a random challenge (e.g., one-time passcode)
  return crypto.randomBytes(6).toString('hex');
}

app.listen(3000, () => {
  console.log('Server started on port 3000');
});
5. Comparing and Contrasting
Now that we’ve met our three authentication methods let’s compare them briefly:
- Session-based: Simple, but sessions can be hijacked.
- Token-based: More secure, as tokens are encrypted and provide fine-grained control.
- Passwordless: Ultra-secure, as it eliminates traditional credentials.
6. Best Practices for Authentication and Authorization in Node.js
Security is an ongoing process. We’ll discuss best practices, such as password hashing, session management, and secure communication, to keep your application safe from threats.
7. Enhancing Security with Middleware
Middleware serves as a crucial component in fortifying your Node.js application’s security. It acts as an additional protective layer, enhancing the overall security posture. Let’s explore how to employ middleware effectively and even provide some code examples to illustrate its usage.
In your Node.js application, middleware functions are intermediaries that can intercept incoming requests, process them, and then pass them along to the next middleware or route handler. This capability allows you to implement security checks, authentication, and authorization, among other tasks.
Here’s a simple example of how to use middleware for authentication in an Express.js application:
const express = require('express');
const app = express();

// Define a custom middleware function for authentication
const authenticateUser = (req, res, next) => {
  const isAuthenticated = /* Check if user is authenticated, e.g., using JWT or session */;

  if (isAuthenticated) {
    // User is authenticated, proceed to the next middleware or route handler
    next();
  } else {
    // User is not authenticated, send an unauthorized response
    res.status(401).send('Unauthorized');
  }
};

// Apply the authenticateUser middleware to a specific route
app.get('/secure-route', authenticateUser, (req, res) => {
  // This route is protected by authentication middleware
  res.send('You have access to this secure route.');
});

app.listen(3000, () => {
  console.log('Server is running on port 3000');
});
In this example, the authenticateUser middleware checks whether the user is authenticated. If authenticated, it allows the request to proceed to the protected route; otherwise, it responds with a 401 Unauthorized status.
This is just a basic example, and middleware can be customized to suit your specific security needs, such as implementing rate limiting, logging, or other security checks.
8. OAuth2 for External Authentication
OAuth2 is a powerful mechanism for implementing external authentication in your Node.js application. It offers a seamless way to simplify user onboarding while simultaneously enhancing security.
When you integrate OAuth2 into your application, users can log in using their existing accounts from providers like Google, Facebook, or GitHub. This not only reduces the hassle of creating and remembering new credentials but also leverages the security measures implemented by these trusted identity providers.
Here’s a brief overview of how OAuth2 works:
- Your Node.js application acts as the OAuth2 client.
- Users are redirected to the identity provider’s login page.
- Once authenticated, the identity provider issues an access token.
- Your application can use this access token to access the user’s information securely.
Here’s an example of how to use the passport-oauth2 strategy in Passport.js to implement OAuth2 authentication:
const passport = require('passport');
const OAuth2Strategy = require('passport-oauth2');
const express = require('express');
const app = express();

// Configure the OAuth2 strategy for a specific provider (e.g., Google)
passport.use(new OAuth2Strategy({
  clientID: 'your-client-id',
  clientSecret: 'your-client-secret',
  callbackURL: 'http://your-app-url/auth/callback',
},
  (accessToken, refreshToken, profile, done) => {
    // Custom logic to handle user creation or retrieval
    // Use the profile information for user registration or authentication

    // Call the done callback when finished
    return done(null, profile);
  }
));

// Set up the OAuth2 route
app.get('/auth/oauth2',
  passport.authenticate('oauth2'));

app.get('/auth/callback',
  passport.authenticate('oauth2', { failureRedirect: '/' }),
  (req, res) => {
    // Successful authentication, redirect or respond as needed
    res.redirect('/dashboard');
  });

app.listen(3000, () => {
  console.log('Server is running on port 3000');
});
By integrating OAuth2, you can simplify the user experience and enhance the security of your Node.js application by relying on trusted identity providers.
9. Securing APIs with JWT
Securing your Node.js APIs using JSON Web Tokens (JWT) is an effective way to protect sensitive data and ensure that only authorized users can access your endpoints.
JWT is a compact and self-contained token format that can carry information about the user’s identity and permissions. It is signed to ensure its integrity, making it a robust choice for API security.
Here’s a high-level overview of how JWT-based authentication works:
- Upon successful login, your Node.js server generates a JWT token and signs it with a secret key.
- This token is sent to the client, typically in the response body or as a cookie.
- Subsequent API requests from the client include this JWT token in the headers or as a query parameter.
- Your server verifies the token’s signature and, if valid, grants access to the protected API endpoints.
Here’s an example of how to use JWT for API authentication in Node.js:
const express = require('express');
const jwt = require('jsonwebtoken');
const app = express();

// Secret key for JWT signing (keep this secret!)
const secretKey = 'your-secret-key';

// Create a JWT token upon user login
app.post('/login', (req, res) => {
  const user = /* Retrieve user information */;
  const token = jwt.sign({ userId: user.id }, secretKey, { expiresIn: '1h' });
  res.json({ token });
});

// Protect an API route using JWT authentication
app.get('/api/secure-route', (req, res) => {
  const token = req.header('Authorization');

  if (!token) {
    return res.status(401).json({ message: 'Unauthorized' });
  }

  try {
    const decoded = jwt.verify(token, secretKey);
    // User is authenticated, proceed with the request
    res.json({ message: 'Access granted' });
  } catch (error) {
    res.status(401).json({ message: 'Unauthorized' });
  }
});

app.listen(3000, () => {
  console.log('Server is running on port 3000');
});
By implementing JWT-based authentication, you can ensure that your Node.js APIs are secure and that only authorized users can access protected resources.
10. Common Authentication Vulnerabilities
Understand the common vulnerabilities that attackers exploit and how to mitigate them, including brute force attacks and SQL injection. If you want to learn more about them there is a link below.
11. Protecting Against Attacks
Learn about security headers, rate limiting, and other measures to protect your application from various attacks. If you want to learn how to protect yourself you can check the following post.
Conclusion:
Security is not an afterthought; it’s a continuous process. By mastering authentication and authorization in Node.js, you can ensure your application is robust against threats, providing a safe environment for your users and data.
In this article, we’ve covered the fundamentals of authentication and authorization in Node.js, provided code examples, and discussed best practices for securing your application. By following these guidelines and staying informed about emerging security threats, you can ensure your Node.js application remains a fortress against potential attacks.
Frequently Asked Questions
Certainly, here are answers to the frequently asked questions:
Q. What’s the difference between authentication and authorization?
- Authentication is the process of verifying a user’s identity, ensuring they are who they claim to be. It typically involves methods like username and password verification.
- Authorization, on the other hand, comes after authentication and defines what actions a user is allowed to perform within the application. It determines the level of access a user has based on their role or permissions.
Q: Is Passport.js the only authentication library for Node.js?
- No, Passport.js is a popular choice for authentication in Node.js, but it’s not the only one. There are several other libraries and frameworks available, such as Firebase Authentication, Okta, and Auth0, each with its unique features and capabilities. The choice of library depends on your specific project requirements.
Q: How can I prevent common authentication vulnerabilities?
- To prevent common authentication vulnerabilities, consider implementing the following practices:
- Use secure password hashing algorithms like bcrypt.
- Implement account lockouts and rate limiting to deter brute force attacks.
- Employ multi-factor authentication (MFA) for an extra layer of security.
- Ensure secure communication using HTTPS.
- Regularly update and patch your authentication library and dependencies to address security vulnerabilities.
Q: What role does JWT play in API security?
- JWT (JSON Web Tokens) is a compact, self-contained way to represent information between parties securely. In API security, JWTs are often used to authenticate and authorize users. They can carry information about the user’s identity and permissions, allowing APIs to verify the user’s access rights without the need to repeatedly query a database. JWTs are digitally signed, ensuring their integrity.
Q: What are the key security headers for a Node.js application?
- Key security headers for a Node.js application include:
- Content Security Policy (CSP): To mitigate cross-site scripting (XSS) attacks by specifying which sources of content are allowed to be loaded.
- Strict-Transport-Security (HSTS): To enforce secure HTTPS connections and prevent protocol downgrade attacks.
- X-Content-Type-Options: To prevent browsers from interpreting files as something other than what they are, reducing MIME-type-based vulnerabilities.
- X-Frame-Options: To prevent clickjacking attacks by specifying whether a browser should be allowed to render a page in a frame or iframe.
- X-XSS-Protection: To enable the browser’s built-in XSS protection mechanisms.
- Implementing these headers in your Node.js application’s HTTP responses enhances its security posture against various web vulnerabilities.